# Smart Announcements
### Type of announcement
You can send a public or a private announcement. Public announcement are visible to all, while private announcements are, well, private and only visible to those who got tagged.
Public announcements are posted in the **channel** you selected. This can be any text channel you want.
Private announcements are send as a **direct message**. Users receive a DM from the bot with the message, and a way to verify that this isn't spam. For users who have DMs blocked, a private thread is created. This is a thread that is only visible to them. They will be tagged in it.
### **Step-by-step guide:**
1. Select **Create Announcement**
2. Set the **date and time** it should be posted. This can be 30 minutes from now or several days in the future.
3. Select if this is a **private** or **public announcement**.
#### For a public announcement
1. Decide what **channel** the announcement should appear. If you see a warning next to the channel Bot needs access you first have to set the [right permissions](#how-to-set-permissions-for-the-smart-announcements-to-work).
2. And finally write your **message**. If you use @-mentions this will show up in Discord and tag the respective people.
{% embed url="" %}
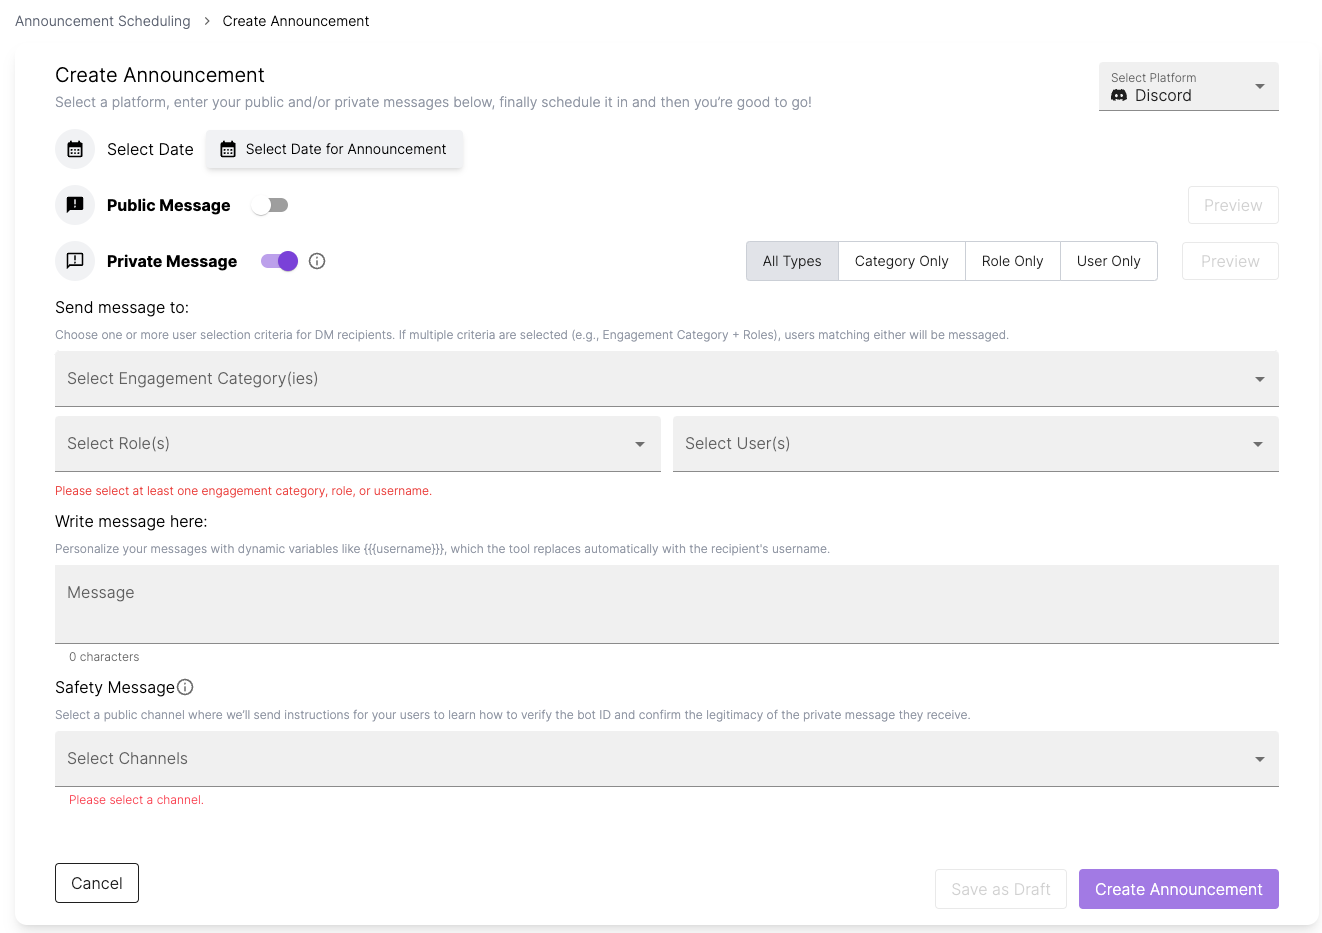
#### For a private announcement
1. Select **who** should be getting the announcement. You can select members by their engagement level, discord role, or user name. You have to select at least one criteria.
2. Write your **message**.
3. Select the **channel** in which the safety message should appear. The safety message explains users how to verify the legitimacy of the bot. The text of the safety message is predefined by TogetherCrew.
{% hint style="info" %}
If multiple criteria are selected in step 1 (e.g., Engagement Category + Roles), users matching *either* will be messaged.
{% endhint %}
{% hint style="info" %}
For users with blocked DMs a private thread will be created in the channel which has the safety message.
{% endhint %}
{% embed url="" %}
### How to set permissions for the Smart Announcements to work?
For the announcement to be posted, TogetherCrew bot needs *write* access in that channel. To keep your community safe by default, our bot only has *read* access to public channels.
You can set write access to TogetherCrew at 3 levels, from broad (server) to fine-grained (channel)
1. Server: Permissions for every category and every channel
2. Category: Permissions for channels grouped into one category
3. Channel: Permissions for specific channels
If you have different permission settings for category and server, then the server settings are overridden by the category settings. Similarly, channel level settings override category level settings.
**How to set permissions**
1. Decide what access level you should grant. We recommend setting write access only for specific channels.
2. Switch to **Discord**
3. Navigate to the channel and select the wheel on the right of the channel name to access its **settings**.
4. Select **Permissions** (left sidebar), and then in the middle of the screen check **Advanced permissions**. You might have to scroll down a bit.
5. Check that TogetherCrew is in the list of Roles/Members that have access to the channel. If not, select the ⊕ and add it.
6. Now, select **TogetherCrew** and scroll down the list of Advanced Permissions. Make sure that the following are marked as \[✓]
* **Read** access settings: Read channel and Read Message History
* For **Write** access settings, the following is required
* Send Message, Send Messages in Threads, Create Public Threads, Create Private Threads
* If your announcement will include links, files and mentions, add these permissions: Embed Links, Attach Files, Mention @everyone, @here, and All Roles
7. Save your settings and go back to TogetherCrew
8. Back in TogetherCrew, go to **Community Settings**
9. On the top right of your Discord server panel, select the menu (three dots)
10. Click on "Show channels"
11. Click on the Refresh List
12. Save and go back to the Announcement page
{% embed url="" %}
### FAQ
**Can I post the same announcement in Discord and Telegram?**As February 2024, our Telegram integration isn't ready. You can only post announcements in Discord.
**Can I post an announcement in several channels?** Yes, you can select as many channels as you want.
**We have weekly community calls. Can I set a recurrent announcement?**Right now you'll have to create each announcement separately.
**I want to send a message to everyone who joined this week. How can I do that?** You'll have to give everyone a role (e.g., cohort 8). Then you can send a private announcement to everyone with the role "cohort 8".
**What are Smart Announcements?** Smart Announcements lets you schedule an announcement and send it to specific people. You'll have the choice between user roles, user names, or user engagement level. You can also choose how users will receive the message (private message, private thread, or public message).